

Why Containerization?
Has it ever happened with you that you create an application which works like a charm in your machine and when you pass this to your friend, It doesn’t work on their machines. But what happened while sharing the application, There can be many reasons like version mismatch of any libraries, different platform etc. And to solve this problem containerization comes into the picture.
Introduction to Containerization :
Containerization is the process that packages software code with operating system, libraries and dependencies required to run the code to create a single lightweight executable called the containers. That can run consistently on any infrastructure.
Now if you will make the container of your application and will share this with your friend. Your friend will be able to run the application as yours without any issues. That’s the biggest benefits of containerizing the application. Now next question comes how to containerize my application. Here docker comes into the picture.
What is Docker ?
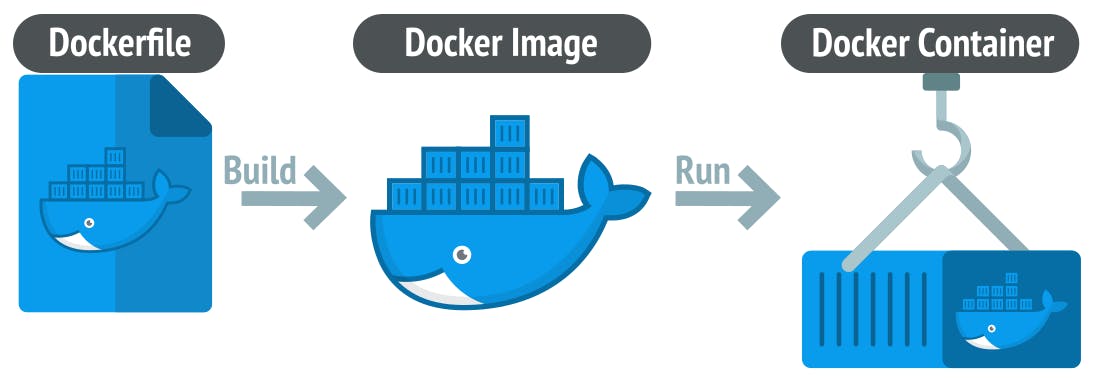
Docker is a platform which helps you to make containerized applications. Docker allows you to build, test and deploy your applications quickly. A developer defines all the applications and their dependencies in a docker file which is then used to make a docker image and when we run that image it is called a docker container. By doing this ensures that your application will run in any environment.
Why use docker ?
Docker is an open platform for developing, shipping and running applications. Docker can help you ship your code faster. You can deploy applications on containers which makes it easier for them to be deployed, scaled, perform rollbacks and identify issues. By taking advantage of docker methodologies for developing, shipping and running code quickly, you can significantly reduce the delay between writing the code and running it in production. As now we are aware about the benefits of docker and why should we use it. Lets see how docker really works.
Docker Architecture :
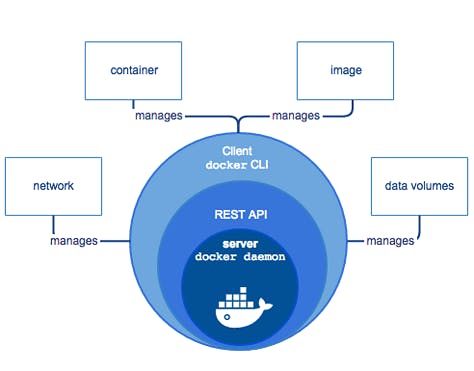
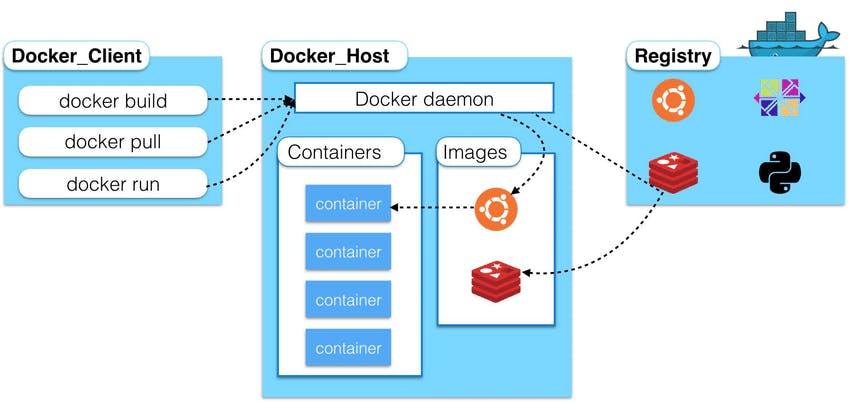
Docker uses a client-server architecture. The Docker client talks to the Docker daemon, which does the heavy lifting of building, running, and distributing your Docker containers. The Docker client and daemon communicate using a REST API.
For download and installation refer this - https://docs.docker.com/
Docker daemon :
The Docker daemon listens for API made through the Docker client and manages Docker objects such as images, containers, networks, and volumes. A daemon can also communicate with other daemons to manage Docker services.
Docker client :
This is what you used to communicate with Docker. When you run a command using docker, the client sends the command to the daemon, which carries them out. The Docker client can communicate with more than one daemon.
Docker Desktop :
Docker Desktop is an easy-to-install application for your Mac, Windows or Linux environment that enables you to build and share containerized applications and microservices. Docker Desktop includes the Docker daemon, the Docker client, Docker Compose, Docker Content Trust, Kubernetes, and Credential Helper. For more information.
For installing docker desktop. Refer this : https://www.docker.com/products/docker-desktop/
Docker registries :
This is the place where docker images are stored. Docker Hub is a public registry that anyone can use, and Docker is configured to look for images on Docker Hub by default. You can even run your own private registry. So when you pull an image docker checks on docker hub by default and saves in your local system on docker host.
You can also create and store images in your local machine and push them into the public registry.
Dockerfile :
Dockerfile describes steps to create a Docker image. It’s like a recipe for your dish. First you have listed down all the steps to perform, to prepare a dish. When the list is prepared, you started executing steps one by one. As result, You will end up with final product.
Same goes with docker file. You mention all the steps for creating the docker image. Docker will execute one by one all the steps and you will get your docker image as end product.
Sample docker file -
FROM node:14
WORKDIR /app
COPY package*.json ./
RUN npm install
COPY . .
EXPOSE 3000
CMD ["npm", "start"]
The explanation for the above docker file-
It is Using the base image (official Node.js image in this example) for creating a image.
Setting the working directory inside the container.
It will copy the package.json and package-lock.json to the container's working directory.
Install dependencies defined in package.json.
Copy the rest of the application files to the container's working directory.
Expose a port for the application to listen on. In this case port 3000.
Command to start the application when the container runs.
Docker image :
A Docker Image is a file that defines a Docker Container. It is similar in concept to a snapshot of a VM. A container that moves from one Docker environment to another with the same OS will work without changes because the image includes all of the dependencies needed to execute the code.
When we run a docker image then it is called a docker container. Images are immutable. Once built, the files making up an image do not change. Images can be stored locally or remote locations like on docker hub.
Basic commands -
 $ docker pull ubuntu // It will pull this ubuntu image from docker hub
 $ docker images (Lists Docker Images)
 $ docker run $imageID (creates a container out of an image)
 $ docker rmi $imageID (deletes a Docker Image if no container is using it)
 $ docker rmi $(docker images -q) (deletes all Docker images)
Docker can build images automatically by reading instructions from a DockerFile. A single image can be used to create multiple containers.
Containers :
A container is a runnable instance of an image. This is where your application is running. You can manage containers using the Docker API or CLI. You can connect a container to one or more networks, attach storage to it, or even create a new image based on its current state.
If we delete a container the data will be lost! Because when the container went down and we brought it back up, the last layer got created again as a new layer. This helps in development if you don’t want to store record for each test.
Basic commands -
 $ docker ps (list all containers)
 $ docker run ImageName/ID (checks locally for image, if not available it will go to registry and then go to DOCKER_HOST)
 $ docker start ContainerName/ID
 $ docker kill ContainerName/ID (Stops a running container)
 $ docker rm ContainerName/ID (Deletes a stopped container)
 $ docker rm $(docker ps -a -q) (Delete all stopped containers)
What Now ?
Now as we have covered all the most important aspects about docker. Now you can go ahead and do some hands-on with docker. Here are some important links to get start with -
How to installing docker - https://docs.docker.com/get-docker/
Hands-on experience tutorial - https://docs.docker.com/get-started/
Thank you for reading this so far :)